-
Install docker
|
Minimum Install requirements: OS: Linux, Ubuntu & Debian recommended and fully supported. Other distributions might work. Memory: 4GB RAM (8GB RAM recommended) Disk space: 50GB, not including space used by the host operating system |
The following packages need to be installed:
|
Additionally, the docker compose plugin (https://docs.docker.com/compose/install/linux/) needs to be installed, the docker daemon must be running and the logged in user must have permissions to communicate with the docker daemon.
Network activity used by scanner listed at the bottom of this document.
-
Set up new scanner
Navigate to Scans page → Internal scans tab to start the setup
Create new scanner with install commands for your network scanner:

Open the newly created scanner and click “Get install command”.
Copy install command and run on the system where you want to install the scanner:
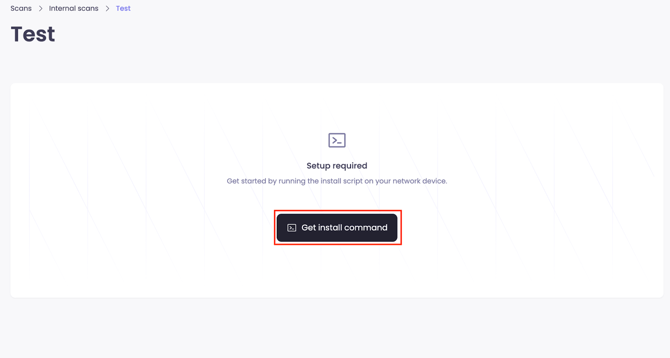
Important: Install command will only be shown once.
Remember to copy details before continuing.
-
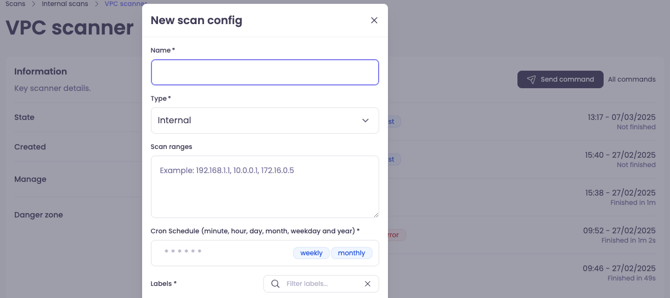
Scan configurations
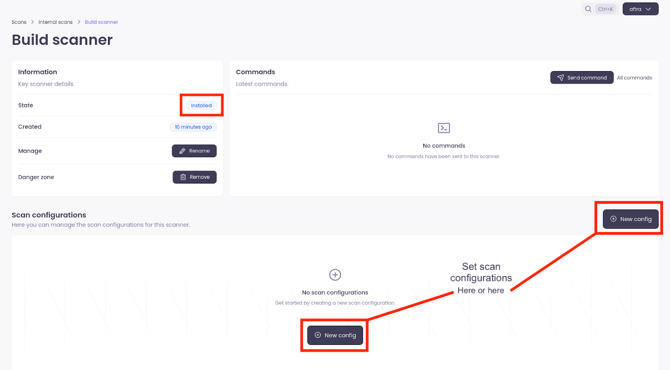
Make sure that state of scanner is “Installed” (top left corner) before setting up scan configuration:
Note: Range, type and chron schedule can be edited at any time.
-
Send command (optional)
You can send the scanner commands to troubleshoot connection:
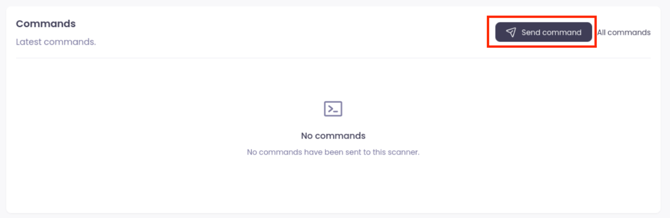
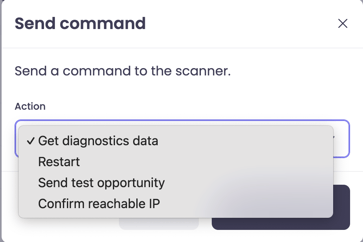
- Get diagnostic data
- Restart: This will restart the scanner
- Send test opportunity
- Confirm reachable IP
-
Troubleshooting
SELinux/RHEL stopping service ais-host-checker
If the machine you set up is running SELinux in enforcing mode you will need to allow the ais-host-checker service to execute, read and write files in the installation directory. Post installation, verify that the service is having problems starting:
systemctl status ais-host-checker
If the “Active” status is “failed”, follow these steps, auditing all commands:
# Creates a TE (type enforcement) file
audit2allow -m aftra < /var/log/audit/audit.log > /tmp/aftra.te
# Optionally check the contents of the type enforcement file
cat /tmp/aftra.te
# Turns the TE file into a SELinux mod (module) file
checkmodule -M -m -o /tmp/aftra.mod /tmp/aftra.te
# Turns the mod file into a PP (policy package) file
semodule_package -o /tmp/aftra.pp -m /tmp/aftra.mod
# Installs the PP file in the current policy / it takes a while to run
semodule -i /tmp/aftra.pp
# Start the host checker service again
systemctl start ais-host-checker
# Verify that the host checker service is running. If it's still failing, repeat the commands in this section, observing that in each run an additional permission is added to the allow list in the module
systemctl status ais-host-checker
Guide to Setting Up Your Internal Network Scanner
This guide will walk you through the initial setup for an internal scanner on your network.
Step 1: Prepare Your Host Machine
Before installing the scanner software, you need a dedicated machine (physical or virtual) that meets the following requirements. This machine will host the scanner and perform the scans.
Minimum System Requirements:
-
OS: Linux. We recommend and fully support Debian, though other distributions may work. (Red Hat testing in progress)
-
CPU: 4 cores at 2GHz or faster.
-
Memory: 4 GB RAM (8 GB is recommended for smoother operation).
-
Disk Space: 50 GB of free space
(this does not include the space used by the operating system itself).
Required Software Packages:
The following packages must be installed on the host machine. These provide the core functionality for running and managing the scanner.
docker |
jq |
python3 |
uuidgen |
logrotate |
unzip |
Final Check: Before you proceed, please ensure that the Docker Compose plugin is installed (see Docker's official guide), the Docker service is running, and your user account has the necessary permissions to interact with it.
Step 2: Generate and Run the Install Command
Now, you'll link your host machine to our platform by generating a unique installation command.
-
In the web interface, navigate to the Scans page and select the Internal scans tab.
-
Click to Create new scanner, which will prepare a unique profile for it.
-
Open the scanner you just created and click Get install command.
-
Copy the command shown in the pop-up window and run it in the terminal of your prepared host machine.
Heads Up: This install command is shown only once!
For security reasons, this unique key will not be displayed again. Please copy the command to a secure place immediately before closing the window and running it.
Step 3: Configure Your First Scan
Once the installation command has finished, your scanner will connect to our platform. You can now tell it what to scan.
First, confirm that the scanner is online. The status in the top left corner of the scanner's page should say “Installed”.
Once you see the "Installed" status, you can set up a scan configuration.
Tip: Don't worry about getting the settings perfect on the first try. The scan Range, Type, and Schedule can all be edited at any time after creation.
Optional: Sending Diagnostic Commands
If you need to check the scanner's health or troubleshoot connectivity, you can send direct commands from the web interface. This is useful for confirming that the scanner is responsive and can reach its targets.
-
Restart: Restarts the scanner's services on the host machine.
-
Send test opportunity: Simulates a scan target to verify the connection works.
-
Confirm reachable IP: Pings a specific IP address from the scanner to ensure it can reach parts of your network.
Troubleshooting
SELinux is Preventing the Scanner Service from Running
On some Linux distributions like Red Hat (RHEL) or CentOS, a security feature called SELinux might block our scanner service (ais-host-checker) from running correctly.
First, check if this is the problem. Run the following command:
systemctl status ais-host-checker
If the “Active” status shows “failed”, SELinux is likely the cause. Follow these steps to create a security policy exception for the scanner.
-
Generate a policy file from the audit log: This command reads the security log to see what SELinux blocked and creates a custom rule to allow it.
Bashaudit2allow -m aftra < /var/log/audit/audit.log > /tmp/aftra.te -
(Optional) Review the generated rule: You can view the contents of the file to see what permissions are being proposed.
Bashcat /tmp/aftra.te -
Compile the rule into a policy module: These two commands package the human-readable rule into a format that SELinux can use.
Bashcheckmodule -M -m -o /tmp/aftra.mod /tmp/aftra.te
semodule_package -o /tmp/aftra.pp -m /tmp/aftra.mod -
Install the new policy module: This command applies the new security policy. Note: This step can take a minute to complete.
Bashsemodule -i /tmp/aftra.pp -
Restart and verify the service:
Bashsystemctl start ais-host-checker
systemctl status ais-host-checkerIf the service is still failing, SELinux may be blocking another action. Simply repeat the steps above to add the new required permission to the policy.
Network Access Required by Scanner
|
Service / Purpose |
Address / Domain(s) |
|
Application Ingress |
fixed.app.aftra.io |
|
Shared Registry
|
registry.shared.aftra.io Port 8834 & Port 80 |