Universal System Requirements
Before installing the scanner software, you need a dedicated machine (physical, VM, or LXC container) that meets the following requirements.
Hardware Requirements:
-
CPU: 4 cores at 2GHz or faster.
-
Memory: 4 GB RAM (6 GB is recommended for smoother operation on virtual machines).
-
Disk Space: 50 GB of free space (this does not include the space used by the operating system itself).
Network Access Required by Scanner:
-
Application Ingress:
fixed.app.aftra.io
(15.197.147.252, 3.33.189.132) via Outbound HTTPS. -
Shared Registry:
registry.shared.aftra.io
(34.248.15.155, 18.202.160.0) via Outbound HTTPS. -
Ports: Port 8834 & Port 80.
Step 1: OS-Specific Host Preparation
Choose the guide that matches your operating system. We recommend and fully support Ubuntu 24.04 LTS as it provides the smoothest experience with the fewest missing dependencies.
Option A: Ubuntu 24.04 LTS (Recommended)
Ubuntu 24.04 comes with several required tools pre-installed, including python3, uuidgen, and sudo.
-
Install prerequisites:
export DEBIAN_FRONTEND=noninteractive
apt-get update
apt-get install -y jq curl unzip ca-certificates gnupg -
Add the official Docker repository:
install -m 0755 -d /etc/apt/keyrings
curl -fsSL https://download.docker.com/linux/ubuntu/gpg -o /etc/apt/keyrings/docker.asc
chmod a+r /etc/apt/keyrings/docker.asc

echo "deb [arch=$(dpkg --print-architecture) signed-by=/etc/apt/keyrings/docker.asc] \
https://download.docker.com/linux/ubuntu noble stable" > /etc/apt/sources.list.d/docker.list -
Install and enable Docker:
apt-get update
apt-get install -y docker-ce docker-ce-cli containerd.io docker-buildx-plugin docker-compose-plugin
systemctl enable --now docker
(Note: If you encounter LC_ALL: cannot change locale warnings, they are cosmetic. You can fix them by running apt-get install -y locales and locale-gen en_US.UTF-8.)
Option B: Debian 13 (Trixie)
Debian 13 minimal lacks several packages, importantly sudo, which is required for the host-checker service to install.
-
Install prerequisites (including sudo):
export DEBIAN_FRONTEND=noninteractive
apt-get update
apt-get install -y jq curl unzip uuid-runtime sudo ca-certificates gnupg -
Add the official Docker repository:
install -m 0755 -d /etc/apt/keyrings
curl -fsSL https://download.docker.com/linux/debian/gpg -o /etc/apt/keyrings/docker.asc
chmod a+r /etc/apt/keyrings/docker.asc

echo "deb [arch=$(dpkg --print-architecture) signed-by=/etc/apt/keyrings/docker.asc] \
https://download.docker.com/linux/debian trixie stable" > /etc/apt/sources.list.d/docker.list -
Install and enable Docker:
apt-get update
apt-get install -y docker-ce docker-ce-cli containerd.io docker-buildx-plugin docker-compose-plugin
systemctl enable --now docker
(Note: If the bootstrap script fails at the host-checker step because sudo was missing, install sudo and run /root/.aftra/scripts/install-systemd-service.sh manually.)
Option C: Rocky Linux 10 / CentOS Stream 10
Rocky 10 minimal is very barebones and requires a specific legacy syntax for adding the Docker repository.
-
Install prerequisites:
dnf install -y which jq python3 util-linux logrotate unzip curl ca-certificates dnf-plugins-core -
Add the official Docker repository:
⚠️ Important: Do not use the
--from-repofileflag as it fails in Rocky 10. Use the older syntax:dnf config-manager --add-repo https://download.docker.com/linux/centos/docker-ce.repo -
Install and enable Docker:
dnf install -y docker-ce docker-ce-cli containerd.io docker-buildx-plugin docker-compose-plugin
systemctl enable --now docker
Option D: Fedora 43
Fedora 43 requires minimal troubleshooting and natively supports the modern dnf5 syntax.
-
Install prerequisites:
dnf install -y jq python3 logrotate unzip curl ca-certificates dnf-plugins-core -
Add the official Docker repository:
dnf config-manager addrepo --from-repofile=https://download.docker.com/linux/fedora/docker-ce.repo -
Install and enable Docker:
dnf install -y docker-ce docker-ce-cli containerd.io docker-buildx-plugin docker-compose-plugin
systemctl enable --now docker
Step 2: Generate and Run the Install Command
Now you will link your host machine to our platform by generating a unique installation command.
-
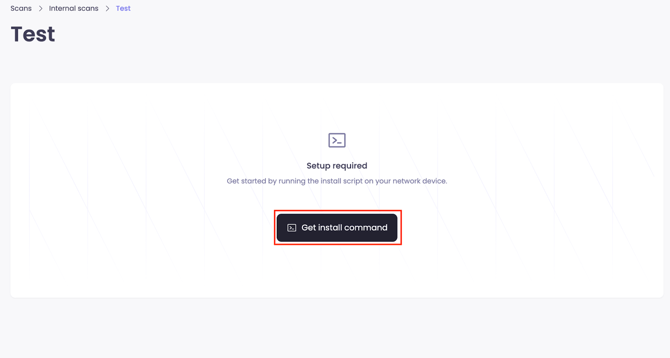
In the web interface, navigate to the Scans page and select the Internal scans tab.
-
Click Create new scanner, which will prepare a unique profile for it.

-
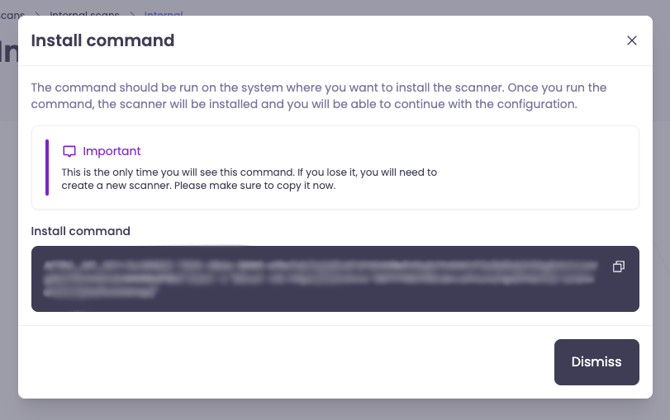
Open the scanner you just created and click Get install command.
-
Copy the command shown in the pop-up window and run it in the terminal of your prepared host machine.
-
The expected bootstrap command format is:
AFTRA_API_KEY=<your-api-key> bash -c "$(curl -sSL https://fixed.app.aftra.io/api/internal-scanners/scripts/bootstrap)"
-
Heads Up: This install command is shown only once!
For security reasons, this unique key will not be displayed again.
Please copy the command to a secure place immediately before closing the window and running it.
Verify the Installation:
Run the following commands to ensure the scanner is healthy:
docker ps --format "table \t"
systemctl status ais-host-checker
You should see ais-scanner (healthy) and ais-command-runner running, and the host checker active.
Step 3: Configure Your First Scan
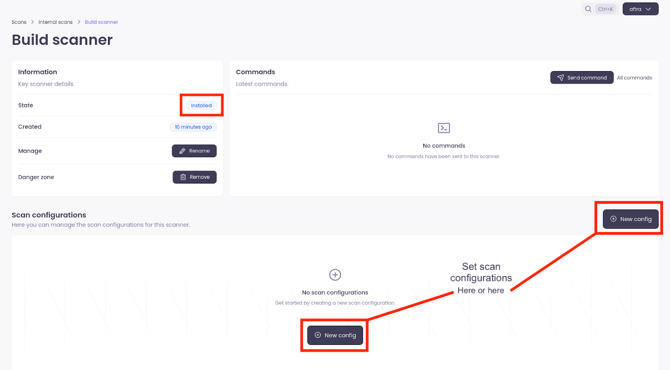
Once the installation command has finished, your scanner will connect to our platform.
-
Confirm that the scanner is online. The status in the top left corner of the scanner's page should say “Installed”.
-
Once you see the "Installed" status, you can set up a scan configuration.
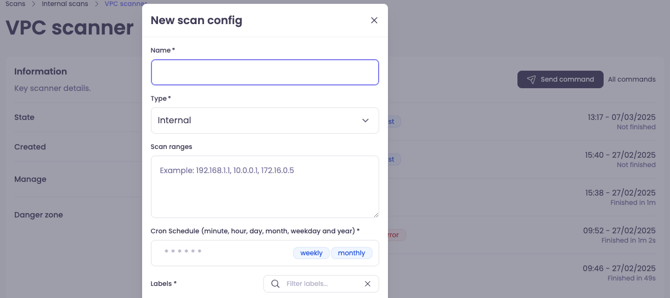
Tip: Don't worry about getting the settings perfect on the first try. The scan Range, Type, and Schedule can all be edited at any time after creation.
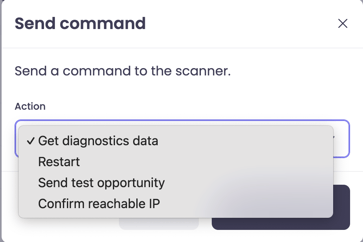
Optional: Sending Diagnostic Commands
If you need to check the scanner's health or troubleshoot connectivity, you can send direct commands from the web interface.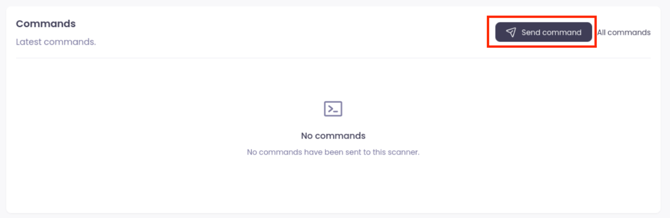
-
Restart: Restarts the scanner's services on the host machine.
-
Send test opportunity: Simulates a scan target to verify the connection works.
-
Confirm reachable IP: Pings a specific IP address from the scanner to ensure it can reach parts of your network.
General Troubleshooting
SELinux Blocking Scanner Service (RHEL/CentOS/Fedora)
On some Linux distributions, a security feature called SELinux might block our scanner service (ais-host-checker) from running correctly.
-
Check if this is the problem:
systemctl status ais-host-checkerIf the “Active” status shows “failed”, SELinux is likely the cause.
-
Generate a policy file from the audit log:
audit2allow -m aftra < /var/log/audit/audit.log > /tmp/aftra.te -
Compile the rule into a policy module:
checkmodule -M -m -o /tmp/aftra.mod /tmp/aftra.te
semodule_package -o /tmp/aftra.pp -m /tmp/aftra.mod -
Install the new policy module (this can take a minute):
semodule -i /tmp/aftra.pp -
Restart and verify the service:
systemctl start ais-host-checker
systemctl status ais-host-checker